Abstract
The installation package contains a component and several other extensions. The component was discussed in the Using the JCH Optimize Component chapter, the other extensions will be discussed in this chapter
Table of Contents
The JCH Optimize Mode Switcher module is placed on the status bar in the administrator site. This provides a drop-down menu of action buttons and info from any page in the administrator section, such as to enable or disable The System - JCH Optimize Plugin .
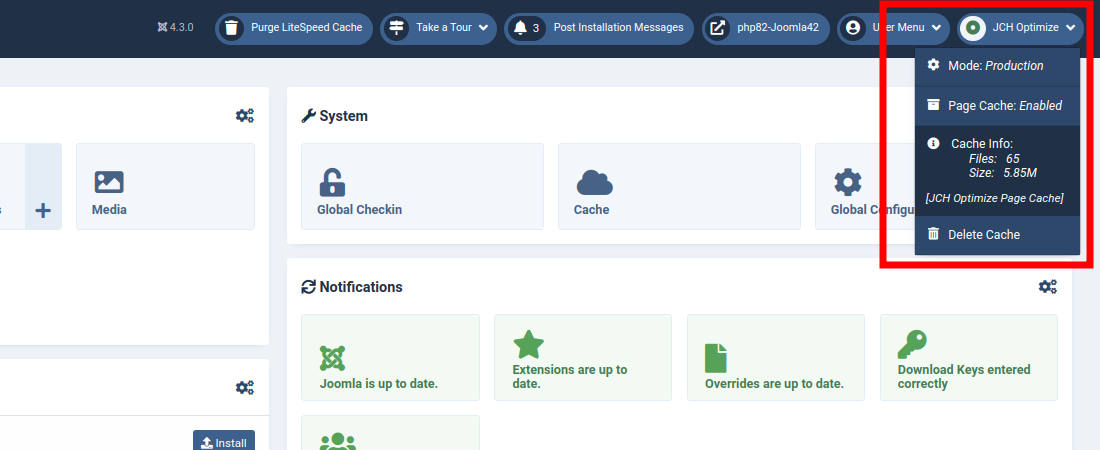
By clicking the first menu item on the drop-down module, you toggle between two states, Production, and Development. In Development mode, JCH Optimize is deactivated on the site and all optimizations of the pages ceases. This is so named because it was designed to enable you to do development work on your site without having JCH Optimize interfere with any changes you may want to perform in case you are modifying resource files, etc. You should always disable JCH Optimize when doing development work on your site. In Production mode, JCH Optimize is reactivated and optimizations of the page resumes.
When toggling from Production to Development and back, all the cache in JCH Optimize is automatically cleared and a new cache hash is generated so the files generated by JCH Optimize will have different names. This allows any changes you've made to your CSS or JavaScript files to be immediately viewed by your users in case the previous files were cached in their browsers.
You can integrate your page cache plugin, such as the JCH Optimize Page Cache plugin with the JCH Optimize Mode Switcher module so that the page cache plugin is disabled when placed in Development mode and enabled when put in Production mode. Alternatively, the second drop-down item allows you to enable/disable the integrated page cache plugin. More on this in the next section.
The next item on the drop-down provides info on the amount of cache saved, and which page cache plugin is integrated with the module and component.
The last item provides a button to delete the JCH Optimize cache. This will delete all the page cache, static combined files, and all other cache generated by JCH Optimize.
The module also shows a visual color indicator, so you can know at a glance without opening the drop-down what is activated.
-
Green . Both the JCH Optimize plugin and the integrated page cache plugin are enabled.
-
Grey . The JCH Optimize plugin is enabled, but the page cache plugin is disabled.
-
Orange . The JCH Optimize plugin is disabled, and the page cache enabled
-
Red . Both the JCH Optimize plugin and the integrated page cache plugin are disabled.
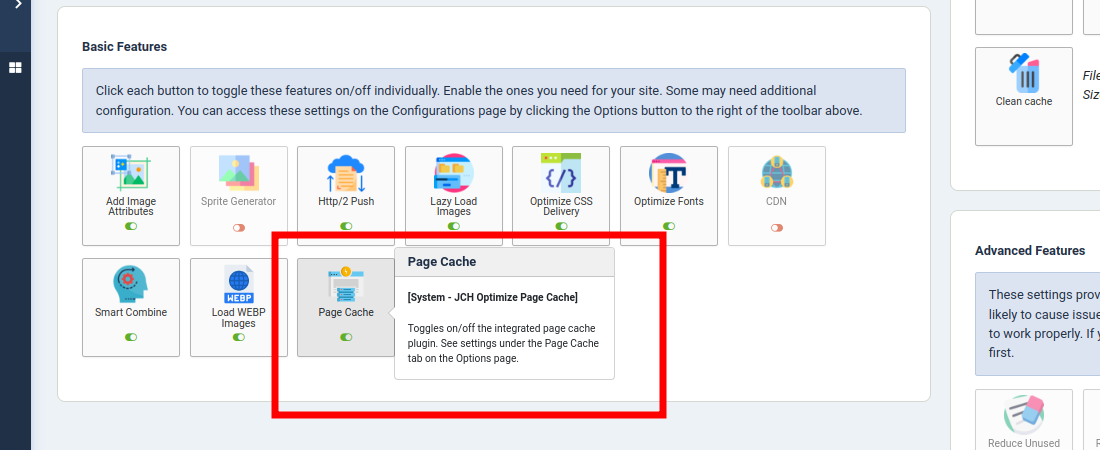
As mentioned above, it is possible to integrate your page cache plugin with the Mode Switcher Module. The option to do that is on The Options Page on the Page Cache tab.

The options are:
-
Integrated page cache -
Select the page cache plugin to integrate with the Mode Switcher. The available options are:
- System - JCH Optimize Page Cache
- System - Page Cache
- LiteSpeed Cache Plugin
- System - Page Cache Extended -PCE
The default is the System - JCH Optimize Page Cache plugin and the option for any plugin on this drop-down list that is not installed on your site will be disabled, so cannot be selected. Whichever plugin is selected here, will also be enabled/disabled by the button on The Dashboard . The title of the selected integrated page cache plugin will show on the popup dialog when you hover over the title of the button.
 Integrated Page Cache Button
![[Note]](/media/com_docimport/admonition/note.png)
Note Enabling the integrated page cache plugin on the Dashboard or the Mode Switcher Module with automatically disable the other page cache plugins.
-
Integrate mode switcher -
You enable this setting if you want the integrated page cache plugin to be enabled or disabled when you toggle between Production and Development mode respectively. This is the recommended setting, but if you prefer, you can disable this setting and enable/disable the page cache plugin separately.
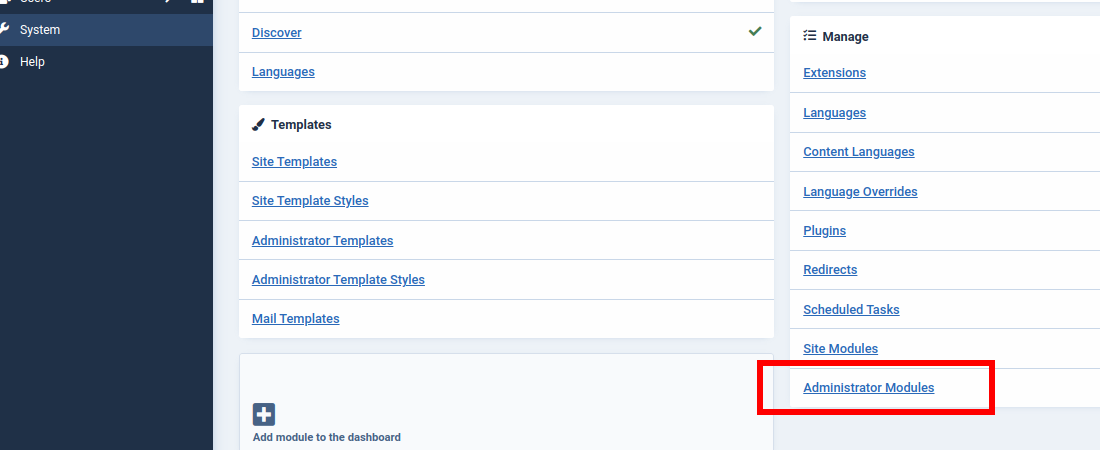
When the package is installed the module is placed last on the status bar and any registered user with access to the administrator site will have access to the module. You can configure the location and access level of the module to your liking. To do so, navigate to the menu item on the left then on the Manage module, click Administrator Modules
Search through the list for the JCH Optimize Mode Switcher or use the search bar to filter for the module and click the hyperlinked name to open the module for configuration. From here you can change the ordering, access level or unpublish the module if you would rather not have it.
